Crochet Larksfoot Granny Afghan
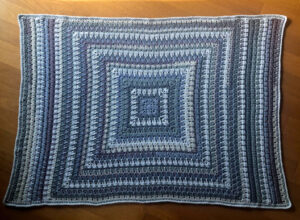
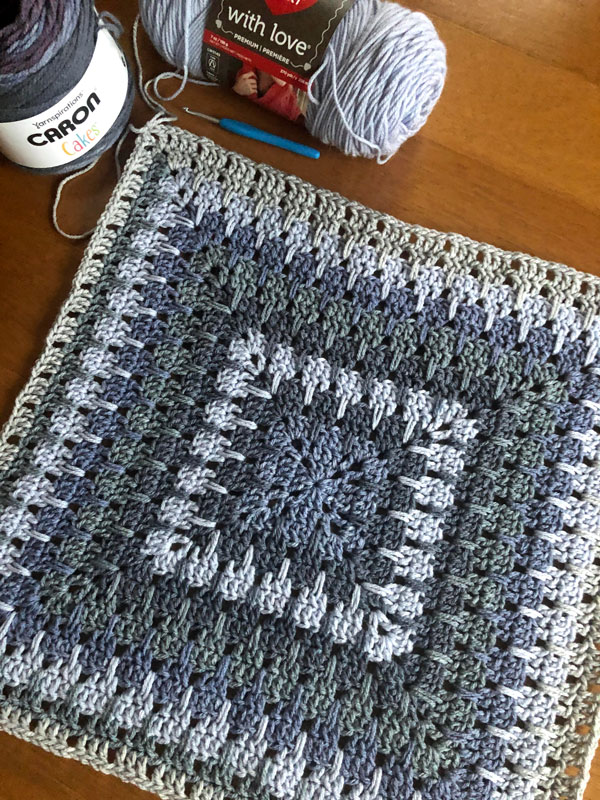
The Crochet Larksfoot Granny Afghan is a FTM (from the middle) design, starting with a square, but then changing to a rectangle.
For this project, I used Caron Cakes with Red Heart With Love yarn and they really worked well together. I have been wanting to design a square to rectangle blanket like this for a while now. The square is lengthened on 2 ends working in rows after the square is completed. But if you enjoy the square, in the case of a bed topper blanket, just keep going until you reach your desired size.
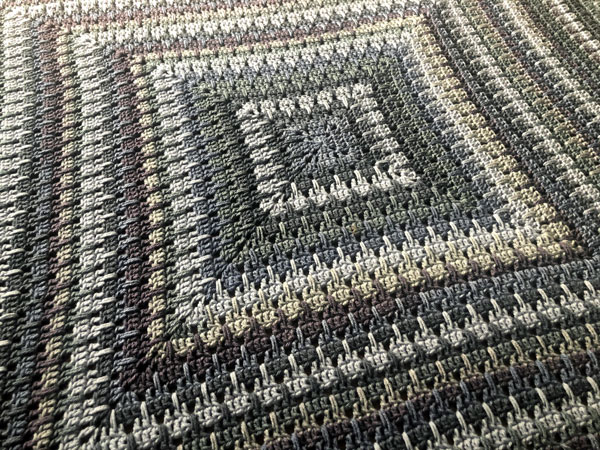
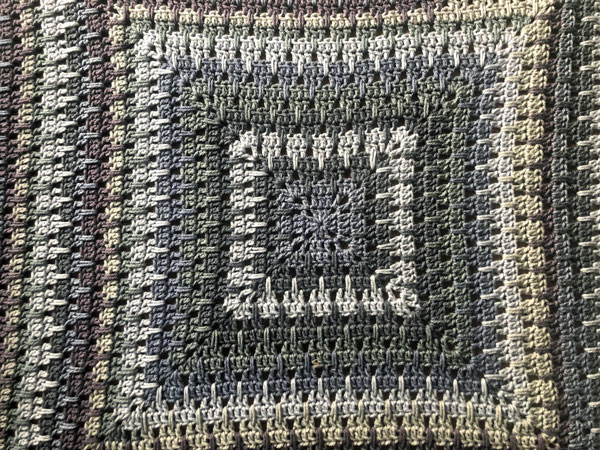
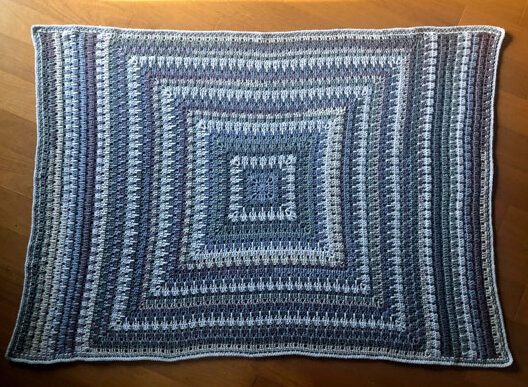
I want to add a disclaimer to this blog. I am just an amateur when it comes to photography. I use the natural light that comes in thru my window. When I zoom in, the colors change from when I pull back. All of the photos you see here are the same blanket. The last 2 photos at the bottom of this post are the closest to the true colors. But don't focus on my colors! Use your imagination to create your own color story. I can't wait to see what other combinations you all will come up with.
When you upload your project to The Crochet Crowd Stitch Social Group or Instagram, feel free to tag me so I can see what you have crocheted. Follow me on Instagram @ jeannestein or on Facebook. My designs can also be saved in your Ravelry favorites by following me HERE.

Tutorial
Larksfoot Granny Afghan
Designed by Jeanne Steinhilber
Caron® Cakes™ Lovely Layers™ (240 g/8.5 oz, 407 m/445 yds)
Color A - Sugar Plums - 4 balls
Red Heart® With Love™ (150 g/5.29 oz, 271 m/296 yards)
Color B - Oxford - 3 balls
Size U.S. H/8 (5.0 mm) crochet hook.
Measurements Approx 45" x 63" [114 x 160 cm].
Abbreviations List
Beg = Begin(ning)
Ch = Chain
Dc = Double crochet
Hdc = Half double crochet
Rem = Remains
Rep = Repeat
Rnd(s) = Round()
Sk = Skip
Sl st = Slip stitch
Sp = Space
St(s) = Stitch(es)
Special Stitches
When working double crochet in space 2 rounds below, pull loop up to match height of current round.
Instructions
1st rnd: (RS) With A, ch 4, in first ch, 2 dc, ch 2, [3 dc, ch 2] 3 times, hdc join to beg ch. 3 dc per side.
2nd rnd: Ch 4 (counts as dc and ch 1), *1 dc in next 3 sts, ch 1,** (1 dc, ch 2, 1 dc, ch 1) in ch-2 sp; rep from * twice, then from * to ** once, 1 dc in beg sp, hdc join to 3rd ch. 5 dc, 2 ch-1 sps per side.
3rd rnd: Ch 3, 1 dc in same sp, *1 dc in next st, ch 1, 1 dc in next 3 sts, ch 1, 1 dc in next st,** (2 dc, ch 2, 2 dc) in ch-2 sp; rep from * twice, then from * to ** once, 2 dc in beg sp, hdc join to beg ch. 9 dc, 2 ch-1 sps per side.
4th rnd: Ch 3, 1 dc in same sp, *1 dc in next st, ch 1, sk next st, [1 dc in next st, 1 dc in sp 2 rnds below, 1 dc in next st, ch 1, sk next st] twice, 1 dc in next st,** (2 dc, ch 2, 2 dc) in ch-2 sp; rep from * twice, then from * to ** once, 2 dc in beg sp, hdc join to beg ch. 12 dc, 3 ch-1 sps per side.
5th rnd: Ch 4, *1 dc in next 3 sts, [ch 1, sk ch-1 sp, 1 dc in next 3 sts] to corner, (ch 1, 1 dc, ch 2, 1 dc, ch 1) in ch-2 sp; rep from * twice, then from * to ** once, ch 1, 1 dc in beg sp, hdc join to 3rd ch. Break A. 14 dc, 5 ch-1 sps per side.
6th rnd: Attach B in any corner sp, ch 4, *1 dc in next st, 1 dc in sp 2 rnds below, 1 dc in next st, [ch 1, sk next st, 1 dc in next st, 1 dc in sp 2 rnds below, 1 dc in next st] to corner,** (ch 1, 1 dc, ch 2, 1 dc, ch 1) in ch-2 sp; rep from * twice, then from * to ** once, ch 1, 1 dc in beg sp, hdc join to 3rd ch. 17 dc, 6 ch-1 sps per side.
7th rnd: Ch 3, 1 dc in same sp, *1 dc in next st, ch 1, sk ch-1 sp, [1 dc in next 3 sts, ch 1, sk ch-1 sp] until 1 st rem before corner, 1 dc in next st,** (2 dc, ch 2, 2 dc) in ch-2 sp; rep from * twice, then from * to ** once, 2 dc in beg sp, hdc join to beg ch. Break B. 21 dc, 6 ch-1 sps per side.
8th rnd: Attach A in any corner sp, ch 3, 1 dc in same sp, *1 dc in next st, ch 1, sk next st, [1 dc in next st, 1 dc in sp 2 rnds below, 1 dc in next st, ch 1, sk next st] until 1 st rem before corner, 1 dc in next st,** (2 dc, ch 2, 2 dc) in ch-2 sp; rep from * twice, then from * to ** once, 2 dc in beg sp, hdc join to beg ch. 24 dc, 7 ch-1 sps per side.
9th rnd: Ch 4, *1 dc in next 3 sts, [ch 1, sk ch-1 sp, 1 dc in next 3 sts] to corner,** (ch 1, 1 dc, ch 2, 1 dc, ch 1) in ch-2 sp; rep from * twice, then from * to ** once, ch 1, 1 dc in beg sp, hdc join to 3rd ch. 26 dc, 9 ch-1 sps per side.
10th rnd: Ch 4, *1 dc in next st, 1 dc in sp 2 rnds below, 1 dc in next st, [ch 1, sk next st, 1 dc in next st, 1 dc in sp 2 rnds below, 1 dc in next st] to corner,** (ch 1, 1 dc, ch 2, 1 dc, ch 1) in ch-2 sp; rep from * twice, then from * to ** once, ch 1, 1 dc in beg sp, hdc join to 3rd ch. 29 dc, 10 ch-1 sps per side.
11th rnd: Ch 3, 1 dc in same sp, *1 dc in next st, ch 1, sk ch-1 sp, [1 dc in next 3 sts, ch 1, sk ch-1 sp] until 1 st rem before corner, 1 dc in next st,** (2 dc, ch 2, 2 dc) in ch-2 sp; rep from * twice, then from * to ** once, 2 dc in beg sp, hdc join to beg ch. 33 dc, 10 ch-1 sps per side.
12th rnd: Ch 3, 1 dc in same sp, *1 dc in next st, ch 1, sk next st, [1 dc in next st, 1 dc in sp 2 rnds below, 1 dc in next st, ch 1, sk next st] until 1 st rem before corner, 1 dc in next st,** (2 dc, ch 2, 2 dc) in ch-2 sp; rep from * twice, then from * to ** once, 2 dc in beg sp, hdc join to beg ch. 36 dc, 11 ch-1 sps per side.
13th rnd: Ch 4, *1 dc in next 3 sts, [ch 1, sk ch-1 sp, 1 dc in next 3 sts] to corner,** (ch 1, 1 dc, ch 2, 1 dc, ch 1) in ch-2 sp; rep from * twice, then from * to ** once, ch 1, 1 dc in beg sp, hdc join to 3rd ch. Break A. 38 dc, 11 ch-1 sps per side.
14th - 37th rnds: Repeat 6th thru 13th rounds.
Begin working in rows with RS facing up.
1st row: Attach B in any corner sp, ch 3, 1 dc in next st, 1 dc in sp 2 rnds below, 1 dc in next st, [ch 1, sk next st, 1 dc in next st, 1 dc in sp 2 rnds below, 1 dc in next st] to corner, 1 dc in ch-2 sp. Turn. 113 dc, 36 ch-1 sps.
2nd row: Ch 3, 1 dc in next 3 sts, [ch 1, sk ch-1 sp, 1 dc in next 3 sts] until 1 st rem, 1 dc in last st. Change to A. Turn.
3rd row: Ch 3, 1 dc in next st, [ch 1, sk next st, 1 dc in next st, 1 dc in sp 2 rnds below, 1 dc in next st] until 3 sts rem, sk next st, 1 dc in last 2 sts. Turn.
4th row: Ch 3, 1 dc in next st, ch 1, sk ch-1 sp, [1 dc in next 3 sts, ch 1, sk ch-1 sp] until 2 sts rem, 1 dc in last 2 sts. Turn.
5th row: Ch 3, 1 dc in next st, 1 dc in sp 2 rnds below, 1 dc in next st, [ch 1, sk next st, 1 dc in next st, 1 dc in sp 2 rnds below, 1 dc in next st] to corner, 1 dc in ch-2 sp. Turn.
6th row: Ch 3, 1 dc in next 3 sts, [ch 1, sk ch-1 sp, 1 dc in next 3 sts] until 1 st rem, 1 dc in last st. Turn.
7th row: Ch 3, 1 dc in next st, [ch 1, sk next st, 1 dc in next st, 1 dc in sp 2 rnds below, 1 dc in next st] until 3 sts rem, sk next st, 1 dc in last 2 sts. Turn.
8th row: Ch 3, 1 dc in next st, ch 1, sk ch-1 sp, [1 dc in next 3 sts, ch 1, sk ch-1 sp] until 2 sts rem, 1 dc in last 2 sts. Change to B. Turn.
9th row: Ch 3, 1 dc in next st, 1 dc in sp 2 rnds below, 1 dc in next st, [ch 1, sk next st, 1 dc in next st, 1 dc in sp 2 rnds below, 1 dc in next st] to corner, 1 dc in ch-2 sp. Turn.
10th row: Ch 3, 1 dc in next 3 sts, [ch 1, sk ch-1 sp, 1 dc in next 3 sts] until 1 st rem, 1 dc in last st. Change to A. Turn.
11th - 16th rows: Rep 3rd - 8th row. Fasten off.
Repeat 1st - 16th rows on opposite end of blanket.
Border
1st rnd: Attach B in any ch-2 corner with a standing sc, ch 2, 1 sc in same sp, 1 sc in each st and evenly across ends of rows, working (1 sc, ch 2, 1 sc) in the corner sps, sl st to beg sc. Break B.
2nd rnd: Attach A in any ch-2 corner with a standing sc, ch 2, 1 sc in same sp, *[sk next st, 1 sc in next st, 1 sc in skipped st] to corner,** (1 sc, ch 2, 1 sc) in ch-2 sp; rep from * twice, then from * to ** once, sl st to beg sc. Break A.
3rd rnd: Attach B in any ch-2 corner with a standing sc, 2 sc in same sp, *1 sc in each st to corner,** (3 sc) in ch-2 sp; rep from * twice, then from * to ** once, sl st to beg sc. Fasten off.

Designs by Jeanne
[the_grid name="Designs by Jeanne"]
Ryan Kaz. says
Should 10th rnd read (ch1, 1dc, ch2, 1dc, ch1) in ch-2 sp? Both ch1's are currently missing. Without them it puts grouping of 4 dc's(instead of usual 3) together before and after corner. Thanks.
Jeanne says
You are correct! I know several have completed this project and you are the first to catch that missing ch 1. I'm updating website now and will update PDF a bit later today. Thank you very much.
Ashley H. says
Anyone figured out a youtube tutorial yet? I can get the first step started but the second step is confusing to me and i cant get it right.
Mikey says
I haven't had time yet. I have had some serious deadlines that I cannot push off my desk until I get them done. The stitch along coming up as my all tied up still. I'm sorry.
Laura H says
In corrected version 2 it shows us using color A for only 5 rounds. I think that's where the confusion comes in.
Jeanne says
Color B is used on rounds 6 & 7, then Color A is used on rounds 8 - 13, which is 6 rounds. Then repeat 6 thru 13.